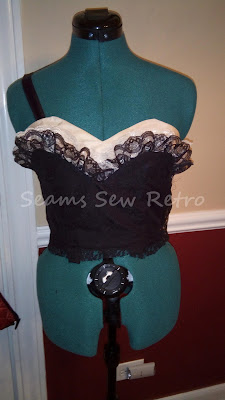
This dress was one of the many wounded birds that I have collected but by far, one of the worst.
I kept pushing it to the bottom of my to-fix pile because it just felt so daunting. The tag was long gone but a similar dress (but in near perfect condition) was listed online as a 1950's Laurie Jane cocktail dress that came with a matching little jacket.
This sad little lady was riddled with holes and I must admit, I foolishy tried to wash out nicotine staining on the top and in the process, killed the netting (though it was riddled with holes anyhow) and some of the black dye lifted to a red color in spots. I wasn't heartbroken over this based on the fact that the skirt was so riddled with holes that I knew I would be patching and attempting to blend my fixes into the dress.
I decided that I had no choice, I would have to take the entire dress apart. I was extremely nervous but on the plus side, this would allow me to trace all the pieces to hopefully keep a pattern of the dress for re-creating in the future.
Deconstructing the dress was a breeze. Most of the thread seemed to just fall apart with a slight tug of the seam ripper.
Each piece was laid on top of muslin, so I could trace the pieces out. Then I used the pieces to trace out pieces of lace that I used as an overlayer on top of the old taffeta pieces. I would carefully pin all in place, then baste it all down so I could treat the two layers as one. My only difficulty came with the skirt front. My lace was not as wide as the taffeta so I had to try to create the skirt out of 3 pieces of lace. I tried to measure it up to have the seams falling just below the bodice darts. I was close but my finished product has a slight difference between the seams and the bodice. Shhhh . . . I am trusting you not to tell anyone who might see me wearing this out!
Once the skirt was re-assembled, I moved on to the bodice.
I actually left the ivory taffeta untouched. It was in nearly perfect shape. There is one little spot of discoloring but it was nothing worth covering up. I like for the dress to keep a little bit of it's history showing. But I did pick off the old netting. Unfortunately, I am not sure what sort of netting this was and trying to keep this as affordable as possible, I went into my stash of vintage lace. It worked out well as I think the lace stays consistent with the lace overlay through out the rest of the dress but also stands and ruffles the way that I believe the old netting would have.
I sewed the darts back in and reattached the sides of the dress. I also kept the straps original as they were still in great shape as well. I reattached them and tested it all out on the form.
At this point, I finally breathed a sigh of relief. It still looked like the original but with a fresh spin to hide it's imperfections (and my undergarments)!
I hemmed by hand and paired it with a petticoat, and realized that I had created my dream cocktail dress! I actually think I like it better than the original!
I think it may be time to start tackling the rest of the repair pile.
Until next time, happy sewing (and mending)!


No comments:
Post a Comment